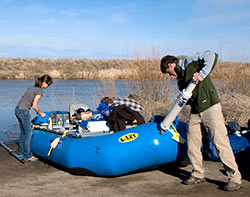
How to Do a Preseason Raft Inspection
 For most rafters, spring is a time to pull out the boating gear and get ready for another season on the water. Unfortunately, that often entails finding equipment in subpar condition. Of course, it’s much better to make this discovery in your garage than at the put-in—or, worse, on the river.
Even if your raft or cataraft seemed fine when you put it away last fall, you should roll it out, pump it up and give it a thorough physical. Chances are good that you came home from your last trip, put your stuff away and forgot about it. And chances are good that you will do the same thing after your first trip this year. Now, before the season starts, is the time to carefully inspect your boat for signs of damage, age, and accumulated wear and tear.
Here are some tips for inspecting your raft or cataraft to make sure it’s ready for the first trip of the season.
Step 1: Inflate the Boat
Inflating your raft or cataraft makes it easier to inspect and allows you to make sure that the boat holds air. While inflating the boat, check to make sure your valves are operating properly and inspect them for any signs of damage. This is also a good time to make sure your fill pump and top-off pump are in good working order.
Step 2: Clean the Boat
Spiders and rodents like to make their homes in rolled up rafts and catarafts, so now’s the time to roust out any wildlife. And if you didn’t clean the boat before you put it away, this is your chance to suck out the sand, wipe off the mud and buff out any marred spots with Inflatable Boat Cleaner. (Who knows, you might even find your missing sunglasses in the process.) While cleaning the boat, you can simultaneously begin Steps 3 and 4.
Step 3: Check for Damage
Examine every inch of the boat, checking for cuts, punctures, scratches, damaged handles or D-rings, and less-than-perfect patch jobs. Check high-wear areas for places where the fabric has worn through to the underlying fibers, or scrim. Common high-wear areas include places where the frame and rigging ride against the boat, where the boat rubs against the vehicle or trailer during transport, and of course the underside of the boat. Repair these areas with a patch or by applying a coat of abrasion-resistant Aquaseal Urethane Adhesive.
Step 4: Check for Signs of Aging
Quality rafts and catarafts, such as those made by NRS and AIRE, will last for many years with proper maintenance and care. Over time, however, UV light, exposure to chemicals and other factors can cause even the best boat materials to degrade. These factors affect different boat fabrics in different ways, but if there is evidence of degradation, you will find it by looking closely. Symptoms of aging can include excessive fading, porosity, fatigue, and brittleness. While it may be depressing to see signs of aging in your old friend, recognizing the problem is the first step toward taking the appropriate preventative or repair measures. And if the aging process is too far along for adequate prevention or repair, then it’s time to consider retiring the boat rather than risking having problems on the river. If you’re unsure how worried you should be, contact your boat dealer or manufacturer for advice.
Step 4: Check for Air Leaks
If you can, leave the boat inflated for at least eight hours to see how well it holds air. Remember that fluctuations in temperature will cause changes in air pressure, so it’s best to compare pressures under similar conditions. (For best accuracy, we recommend using a pressure gauge.) Find leaks by applying a soap and water solution to suspected areas. Finding a slow leak can be frustrating. A solution made with glycerin, which gives bubbles a higher surface tension, will locate even the tiniest leak. Consult our website for resources on how to fix the problem, or give us a call.
Step 5: Inspect Oars or Paddles and Other Accessories
Loose T-grips, fractured blades, crooked shafts, bent oarlocks—hard boating can and does take a toll on oars, paddles and other key pieces of equipment. Discovering problems on the river can ruin your day, so carefully inspect oars, paddles, oarlocks and other important accessories before loading up for the trip. If you’re running a rowing frame, it’s a good idea to set up your frame on the boat and make sure all the parts are there and in good working order. Your neighbor might look at you funny when you’re sitting in the rowing seat with a wistful look in your eyes, but whatever.
Step 6: Inventory and Restock Your Repair Kit
How old is your glue? Did you ever get that valve wrench put back? Did you restock your patching material after making that repair? Before the season starts is the best time to open up your repair kit, inventory the contents and restock it. Most repair adhesives have a limited shelf life, so check the date on the container to make sure it’s still usable.
While you’ve got the boat clean and inflated, take the opportunity to apply the season’s first coat of 303 Protectant to help prevent sun damage. Now you’re ready to load up the boat and head to the river, knowing that your equipment is ready for the season. Hopefully your boating partners inspected their rafts or catarafts, too!
 NRS Gift Card: Always Fits, Always Wanted


