How to Repair an Oar or Paddle Blade
Here we show how to repair a cracked oar blade. This technique can also be used on most kayak, stand up, raft and canoe paddles.
I’m a great fan of our G/flex Epoxy Adhesive. It provides a strong bond that’s much more flexible than other epoxies. It also sticks to an amazing variety of stuff, including some plastics that not many adhesives will work on. I’ve patched all sorts of stuff with it, both boating gear and little projects around the casa.

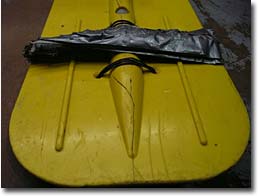
Years ago I did a low water Idaho Middle Fork Salmon trip. Pinball, hang up, almost-got-wrapped sort of trip. I broke every oar blade I had. Three of them were “shark bit” but one was cracked down the middle. I did an on-the-river patch job to keep that one from totally going to hell. I tied “bailing wire” across the center spline of the blade to hold the two halves together. Then I took a thick section of green willow branch, split it down the middle and with one half on each side of the blade, tightly wrapped it with duct tape, to give it flexural stability. The patch worked fine and got me off the river.

The blade has been laying around the garage, as a memento and good BS story show-and-tell prop. Recently I decided to try patching it with G/flex 650. This is the viscous liquid form of G/flex. G/flex 655 is the thickened version, in “toothpaste tubes”, where you squeeze out equal lengths of resin and hardener.
I used the 650 because I was combining it with lightweight woven fiberglass cloth to reinforce the repair. The more liquid 650 would wet the cloth and was easier to work with.

I simply followed the very complete instructions that come with the adhesive. I first washed the repair area with soap and water to remove obvious soiled gunk. After I dried the area, I cut a piece of fiberglass cloth to cover the repair area (I visited a local boat repair shop and they just gave me a small scrap). I used a pencil to lightly outline the area I wanted to cover.
Then I cleaned the area with acetone to be sure there were no oils, grease, etc that would interfere with the bond. You could use other solvents, like alcohol or toluene, for this cleaning step. Next I took some 100-grit sandpaper and buffed the area to give a “tooth” to the surface for the epoxy to grab onto.

The next step, flame treating the oar blade surface, deserves more detailed description. Some plastics really resist adhesive bonding. Playing the flame of a propane torch over the surface will dramatically improve adhesion. G/flex says, “allow the flame to touch the surface, but keep it moving—about 12-16 inches per second.” You see no visible change but oxidation changes the surface somehow at the molecular level so that adhesives and coatings stick better. Sounds like voodoo but it does work; I’ve read and heard of the effect from multiple sources.
G/flex also says, “While flame treating will improve adhesion to most plastics, it appears to provide the greatest benefit to polyethylene. If you are unsure of the type of plastic, it doesn’t hurt to flame treat.” Since I don’t know what kind of plastic Carlisle used when that oar blade was made, I decided to flame treat.

Then it was time to get to the sticky, messy part. The adhesive is mixed 50/50, resin and hardener. I didn’t get fancy with measuring, just squeezed on the two containers equally. You’ve got 45 minutes or so to apply the mixed epoxy, plenty of time to get the job done.
I first brushed the mixture on the oar blade (trimmed the bristles on the brush for extra stiffness). Then I laid the cloth on the blade and worked it down into the wet epoxy. I brushed more on to get a good coverage.
The job didn’t take long. My finished product looks a little rough, but what the heck, it’ll just get banged up again on the river. Practice makes perfect; if I did a couple more, the job would probably look better.

The flexible nature of G/flex makes it an excellent adhesive to absorb the stress of expansion, contraction, shock and vibration that you get with boating gear. Its other great property is its ability to bond dissimilar materials together.
Notes on safety: As always, use care when working with adhesives and solvents. Work in a well-ventilated area and wear gloves. We use disposable nitrile gloves because they are more chemically resistant than the more common latex gloves. And when using the propane torch, make sure any solvent containers are capped and flammable materials are out of the way.

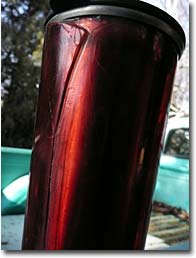
Here’s another little G/flex repair job. I have this double-wall travel mug. Every morning before work, I brew up freshly ground, fair trade, Arabica-grade coffee with my AeroPress, into that mug (yeah, you got it, I’m a bit of a coffee snob). It has a stainless steel inner and a plastic outer wall. More than once, I’ve set the mug on the top of the car as I blearily stow my computer bag and lunch inside the vehicle. Then, I’ve heard the clatter of the mug hitting the pavement as I backed out of the driveway.
The plastic is split from top to bottom. I just took my pocket knife and scraped a “vee” in the split and filled it with 655 G/flex. Yeah, it looks like the scar on the Frankenstein monster, but it works. And I didn’t do the repair because the mug has any sentimental value. It didn’t even cost me anything; I got it at one of our vendor clinics. I just fixed it because I didn’t want to throw the thing away. Sure, I wouldn’t have bought G/flex just to repair this mug, but since I already had it as part of my repair supplies, fixing the mug was a no-brainer.
So, I can heartily recommend G/flex for your repair needs. To learn more about its uses, check out:
- West System G/flex® Epoxy Adhesive—An article from our Tech Talk series. It contains links to some articles that the technical staff at G/flex have written on the various uses for the adhesive. The one on D-rings and G/flex Epoxy describes the testing of adhesion of D-rings we sent them back when we were first considering picking up the adhesives.
- Instructions for 650 G/flex (pdf)
- Sample projects from the 650 G/flex instructions (pdf)
- Instructions for 655 G/flex (pdf)
- Sample projects from the 655 G/flex instructions (pdf)